Her kan du købe
Har du brug for råd? Vores højtuddannede forhandlere hjælper gerne med spørgsmål, små som store.
Find en forhandler i nærheden af dig
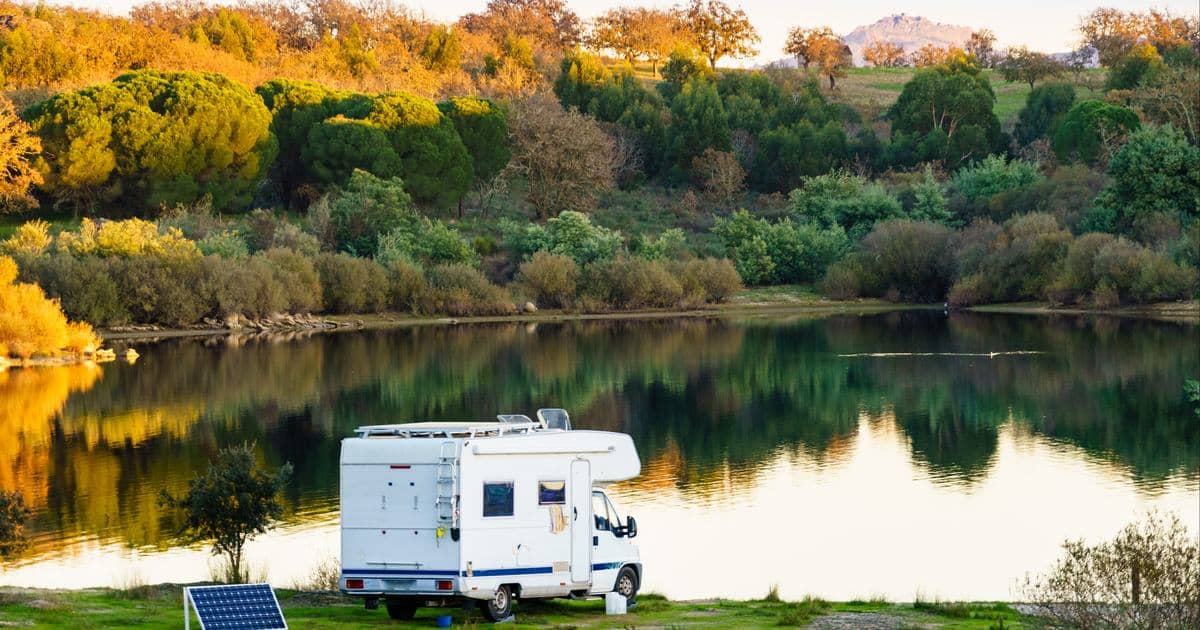
How to size a solar system for your RV
A quick guide to getting started with RV solar systems

One of the things that makes living in a home on wheels appealing is the freedom of not being dependent on a fixed energy source, allowing you to travel and stay almost anywhere. A solar system plays a big role in this. However, it can be a confusing topic for many vanlifers who are just getting started. In this post, we look at the key concepts that help you understand and size a solar system for your RV.
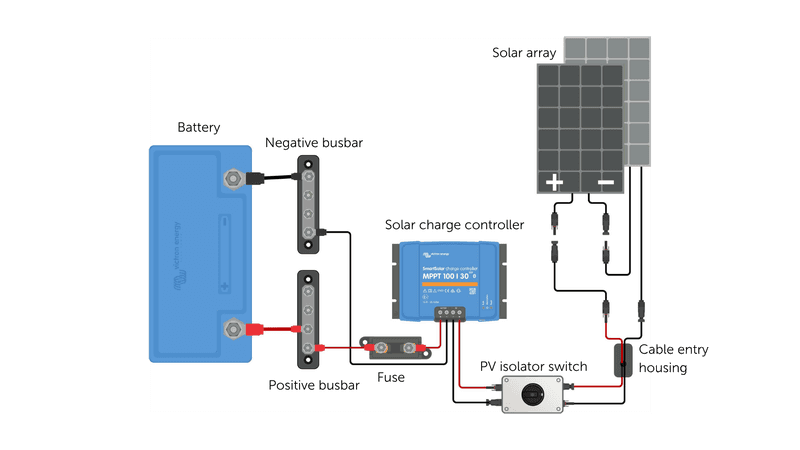
A typical campervan solar system is built around the following three main components:
Convert sunlight into DC electricity. Two common types are used on campervans are:
You may come upon other technical terms relating to solar panel technologies and architectures; read all about the different types of solar panels in our comprehensive guide.
Regulates the power coming from the panels and charges the battery safely. It prevents overcharging and helps maintain battery health. There are two main solar charge controller types:
Load output
SmartSolar and BlueSolar MPPT solar charge controllers smaller than 100/30 also include a load output, which is not shown in the wiring diagram above. This allows small DC loads, such as lights or USB chargers, to be connected directly to the controller. The controller can automatically disconnect these loads if the battery voltage becomes too low, helping to protect the battery from deep discharge.
And of course, we need a correctly sized leisure battery to store the energy received from the panels and other charging sources.
Alongside the main components, a safe and reliable PV system also requires:
Optional Accessories:
All the components in your electrical system work together and should really be sized as a whole, rather than in isolation. It's of course possible to piece together an electrical system from whatever secondhand components you find online, and it might even run a small fridge, a few lights, and some USB chargers. But let's not leave that to luck. Instead, let's have a look at how to size a solar system properly step-by-step.
This is the starting point before buying any components for your RV electrical system. Grab a piece of paper and picture yourself in your recently converted campervan. You're finally on the road! What would your day look like? Would you press the button on your espresso machine first thing in the morning? Would you still want to use your hairdryer on winter evenings? Once you've pictured your day, calculate your daily consumption in watt-hours (Wh) by multiplying the power of each appliance by the number of hours you expect to use it per day.
Example:
Total daily consumption = 720Wh
This number gives a good starting point for sizing both the solar array and the battery bank, which need to be suitably sized to match each other.
A 12V system with a 720Wh daily consumption would need around 60 Ah per day (power consumption in Wh ÷ system voltage in V = Ah). If you'd like to be able to stay off-grid without having to charge your batteries, for let's say 3 days (i.e. you're parked under the shade somewhere in nature, and don't want to drive around), you would need 180 Ah (daily Ah × number of days off-grid = total Ah needed).
However, batteries can't be fully discharged, so depending on the battery chemistry, you'll need to consider a buffer. Lithium batteries can typically be safely discharged to about 90% of their rated capacity, while lead-acid batteries usually only allow around 50% usable capacity. So for this system, you'd need roughly a 360Ah battery bank for lead-acid (180 ÷ 0.5), or about 200Ah for lithium (180 ÷ 0.9).
The watt rating of a solar panel shows the maximum power it can produce under ideal conditions, i.e. without partial shading or dirty panels.
But as you can guess, solar panels can't supply this power all day. Instead, solar calculations use Peak Sun Hours (PSH), which represent the equivalent number of hours per day when sunlight intensity averages 1000 W/m².
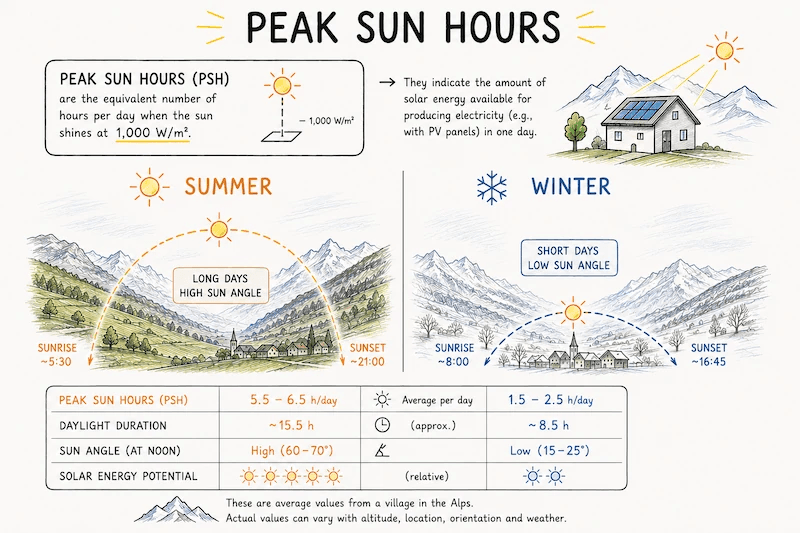
Average PSH values for different locations and seasons can be found online.
Peak sun hours vary depending on where you travel and during which months. An Alpine village in summer, for example, may get around 5 peak sun hours per day. So, an RV designed for summer trips in the Alps, with a daily energy consumption of 720Wh, would roughly need a 144W solar array to fully replenish that energy each day (720Wh ÷ 5 hours = 144W).
However, there's one more thing to consider. In the example above, we sized the battery bank to supply energy for 3 days without charging (optional, but we wanted more freedom), and concluded that a 200Ah lithium or 360Ah lead-acid battery bank would be a better fit for this system.
Now, let's assume, for a moment, that solar is the only charging source for this system (disregarding alternator and shore power charging). In this case, it would take roughly 18 peak sun hours to fully recharge the 360Ah lead-acid battery bank, or 15 peak sun hours to fully recharge the 200Ah lithium battery bank, using only the 144W array.
For an RV that doesn't drive around much and stays off-grid most of the time (i.e. relying mainly on solar to recharge), this isn't ideal, and a bigger solar array is recommended. Being able to fully recharge your batteries in 4-5 peak sun hours, using solar alone, is a much more practical target, since it means your batteries can realistically recover within a single sunny day, rather than needing 3-4 days of consecutive sunshine.
Based on this, you'd need to roughly triple the array size, to around 450-500W, to bring full recharge time down to about 5 peak sun hours. This is why solar arrays are often sized well beyond the daily-consumption minimum, especially for RVs that spend extended periods off-grid.
Before selecting a solar charge controller, let's look at the key specs of solar panels, the wiring options, and how each affects the system, and how that connects to controller selection.
When comparing solar panels, three values are especially important: wattage (W), open circuit voltage (Voc), and short circuit current (Isc).
Solar panels can be wired in series, in parallel, or in a series-parallel combination, and each affects the system differently.
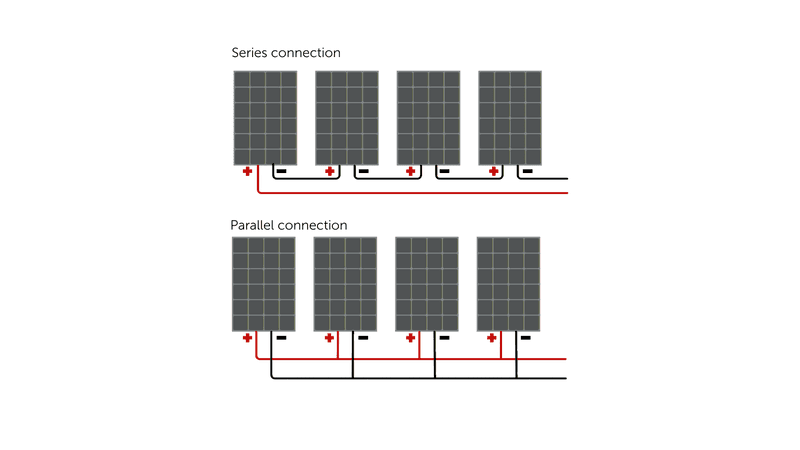
Now that we know the solar panel specs and how wiring affects the system, we're ready for the next step: figuring out what size solar charge controller you need.
If you'd like a quick answer without digging into the details, our MPPT sizing calculator can do the work for you. Otherwise, read on for a deeper understanding of how it all fits together.
Victron Energy MPPT chargers are named directly after their two key limits: maximum PV input voltage and maximum charge current. Take the SmartSolar MPPT 100/30, for example:
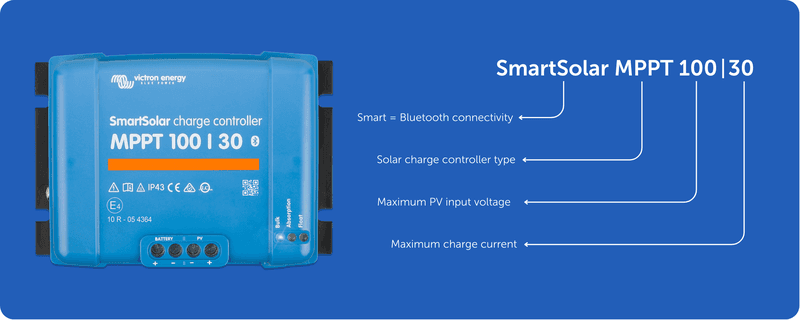
This means the charger can accept up to 100V from the solar array and deliver up to 30A of charging current to the battery.
So, selecting the correct solar charge controller size depends on:
Sizing a solar system for your RV starts with understanding your energy use and choosing components that work well together. A well-designed system not only considers your power requirements, but also how you'd like to use your van. For example, do you usually drive from one spot to the next after a few days? Or do you prefer staying longer at one spot? Do you usually go to campsites and want shore hookup to help with solar, or do you want complete freedom? We hope this post helps you build a system that fits your travel style. For more a more detailed look at the related process of sizing your leisure batteries, see our step-by-step guide.
For those of you looking for a better explanation of how MPPT charging works, have a look at this video:
How does a Victron Energy MPPT Solar Charge Controller work?
If you need professional help with system sizing or installation, you can use our dealer overview to find the nearest Victron Energy installer. They can help ensure your system is safe, reliable, and suited to the way you travel.
Beril Berkem • 16 June 2026
How much does an RV solar system cost?
Get a feeling for the cost of an RV solar system and its components through some helpful examples and tips.
Chris Wallace-Tarry • 30 September 2026
What Type of Solar Panels are Best for an RV? A Comprehensive Guide
Solar panel types, technologies, and architectures explained.
Beril Berkem • 16 June 2026
RV Shore Power: A beginner's guide
Understand the essence of having multiple power sources for your RV's electrical system and learn how to add shore power to yours.Har du brug for råd? Vores højtuddannede forhandlere hjælper gerne med spørgsmål, små som store.
Find en forhandler i nærheden af dig
Tjek vores supportressourcer eller kontakt din originale forhandler for dedikeret support, reparationer eller garantianmodninger.
Support
Læs mere om vores brancheførende 5-års standardgaranti og globale reparationsservice.
Garanti


©Victron Energy 2026